A utility knife earns its place in your kit when it gives you a controlled way to make the cut you need. Before extending a blade, check whether a package can be opened without one or whether a suitable guarded cutter would make the job easier to organize.
This guide is for ordinary packaging and similar light tasks, with the exact knife instructions deciding the permitted materials, blades, and handling method. Thick sheet goods, roofing, flooring, and specialized materials need their own task guidance rather than a more forceful version of opening a box.
Choose the cutting tool before choosing the blade
CCOHS recommends first considering whether you can eliminate the blade or use a different tool or guarded design. That is a useful starting point for a home delivery pile as well as a workshop.
Look at what actually holds the package closed. A removable tape tab, a loose outer sleeve, and a tightly bound carton create different jobs, so do not reach for the longest exposed edge by habit.
Read the intended materials and cutting limits for the exact tool you are considering. For instance, OLFA’s SK-16 page describes a concealed-blade design for specified packaging tasks, which is a different design from a conventional exposed utility blade.
You do not need to own every knife style. You need a suitable, correctly functioning tool whose instructions you understand for the material in front of you.
Understand what your knife does when you stop
MARTOR distinguishes several retraction mechanisms, including automatic models that require you to release the trigger and fully automatic models that retract after leaving the material even when the actuator remains pressed. Do not assume two sliders behave alike.
Find the operation and checking procedure in your own knife’s instructions before starting a cut. Learn the mechanism with the tool handled as directed, rather than discovering its behavior while you are already pulling through a carton.
A manual retractable blade also needs a deliberate end-of-cut action. CCOHS advises fully retracting a retractable blade immediately after use, so make that part of the task instead of postponing it until you have cleared the table.
If the mechanism sticks or does not behave as its instructions describe, stop using the knife. MARTOR advises taking a cutting tool out of service when wear or a malfunction affects its safety technology, rather than modifying or repairing it yourself.

Set up the whole cut before exposing an edge
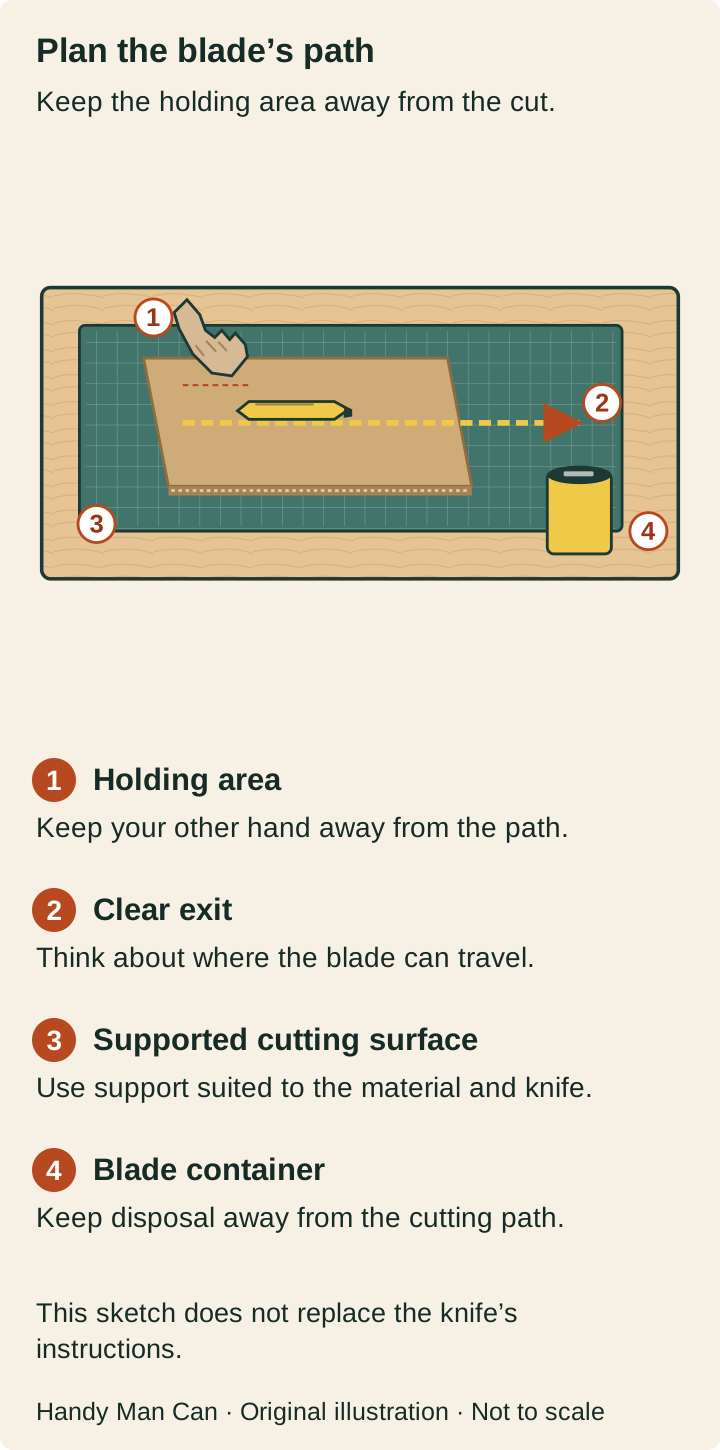
Clear a stable, well-lit work surface and use appropriate cutting support to protect it and keep the material from sliding. CCOHS recommends mechanical holding where possible and keeping all body parts out of the cutting path, including the path a slipping blade could take.
Picture the start of the cut, the end, and the space beyond the edge of the material. If your drawing puts your holding hand or body beyond that line, reposition the work before you continue.
For a carton, inspect where the closure sits relative to the contents. You may need a packaging tool designed to limit penetration rather than a deeper exposed blade that makes the contents part of the guessing game.
Consider the last part of the cut as carefully as the first. A small piece can become awkward to support when it is almost detached, so decide how it will remain controlled before you begin.
Keep interruptions out of the setup too. If someone needs your attention, finish stopping and securing the knife before turning toward the conversation.
Check blade compatibility and condition
Match the replacement blade’s exact type to the knife manufacturer’s compatibility list. A blade that can be pushed into the handle is not enough evidence that it belongs there.
Keep the blade package until you have recorded its identifier with the knife instructions. That saves you from trying to identify a loose blade by a vague memory of the box color.
Inspect the knife and edge as directed before use. MARTOR explains that a blunt blade can demand more force and lead to uncontrolled slipping; pressing harder is not the right response to a tool that no longer cuts as expected.
Stop and reassess when the task changes from a controlled cut into a struggle. The cause might involve the blade, the material, the tool choice, or the support, and none is resolved merely by extending more metal.
Keep the planned path visible and clear
Use only the exposure and technique the exact task and tool instructions call for. There is no useful universal blade-extension measurement for every packaging material and knife design.
With the knife secured, place the material so you can see the complete route you intend to cut. Move clutter and tools out of that route before restarting, rather than using your free hand to clear them during a stroke.
CCOHS advises cutting away from your body and not using a knife as a pry bar, screwdriver, or other substitute tool. Keep those extra jobs separate: if you need to loosen a staple or open a fastener, secure the knife and select the intended tool.
Keep the knife instructions with your unpacking supplies, particularly when more than one adult uses the area. Agree on which tool belongs to which task so the next person inherits a clear arrangement.
Prepare for blade changes before you need one
Read the exact blade-change procedure and gather the specified supplies before opening the knife or dispenser. Similar-looking handles can use different locks, release sequences, and storage arrangements.
MARTOR directs users to the product-specific manual, safety poster, or training video for blade changes because the procedure cannot be generalized. Apply the same habit to any knife you own: find its own instructions instead of copying a demonstration for another model.
For snap-off knives, do not improvise a snapping method or use your fingers to break a segment. Follow the knife maker’s instructions and the specified snapping accessory’s compatible sizes and protection requirements.
OLFA’s DC-4 disposal can, for example, specifies the blade sizes it can snap and distinguishes those from other blades it can store. The existence of a disposal slot does not mean every blade can be snapped in it.
Make a short unpacking plan for a mixed delivery
If several packages arrive together, identify the closures and contents before you start cutting through them. Put the box you are handling on the prepared surface and leave the others outside your immediate working area.
A carton with a labeled opening seam, a padded envelope, and a strapped package may call for different suitable tools. Grouping them by opening method helps you avoid carrying an exposed knife between unrelated jobs.
Keep a place for the paperwork and a separate place for the opened packaging. That lets you check the contents against the delivery list without searching through material that is still waiting to be opened.
If you cannot see how to open an unfamiliar package without contacting its contents or creating an awkward cut, stop and check the sender’s directions. You are trying to unpack the item in good condition, not prove that one knife can solve every closure.
Finish one package, secure the tool, and reset the surface before starting the next. A repeatable arrangement gives you time to notice what changed instead of turning a delivery pile into one continuous cutting task.
Close the job with contained blades and secure storage
Have a suitable puncture-resistant blade container ready before removing a used edge, as CCOHS recommends for broken, dull, or rusty blades. Follow your local disposal program’s directions for the sealed container rather than leaving loose blades in ordinary project waste.
Store the secured knife, compatible replacements, instructions, and disposal container where authorized adult users can find them and children cannot access them. Then clear the cut pieces and inspect the work surface, so the next person inherits a usable bench rather than a hidden sharp edge.