Reach for a drill driver when you need a controlled hole or light fastening with an adjustable clutch. Consider an impact driver when compatible fasteners need repeated, demanding driving, then return to the actual tool and fastener instructions before committing to the job.
Owning both can be convenient, but you do not need to use both on every project. A clear division of work prevents the common mistake of choosing the tool that feels strongest when the task really needs better alignment or a gentler finish.
Understand what changes inside the tool
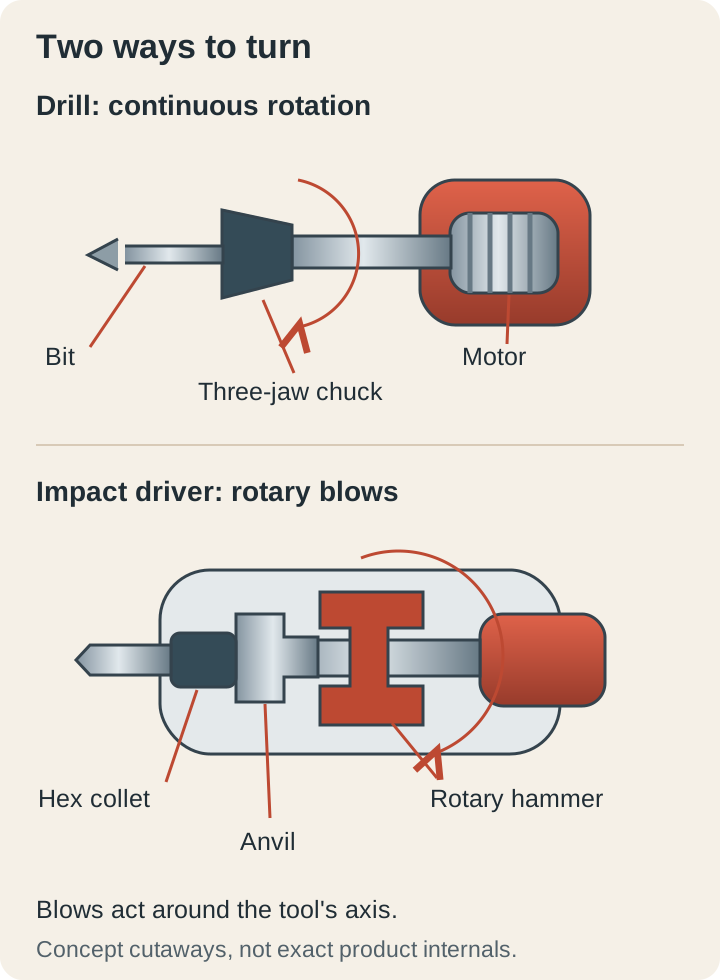
A conventional drill turns an accessory held in a chuck, giving you a familiar arrangement for a wide range of round-shank and suitable hex-shank bits. Many drill drivers also provide an adjustable screwdriving clutch, which gives you a useful way to approach delicate seating on a practice joint.
Bosch explains that an impact driver uses a hammer-and-anvil mechanism to deliver rotational blows under load. Common impact drivers hold quarter-inch hex-shank accessories in a collet, so they do not accept an ordinary round-shank drill bit directly.
Those rotational blows are different from the forward percussion of a hammer drill used with compatible masonry accessories. Do not select a tool by the word “impact” alone, especially when descriptions use different regional terms for drills, drivers, and combination tools.
If your goal is a hole, start with the drill
For drawer-pull holes, a small pilot in wood, or another location where position matters, a drill is usually the more straightforward starting tool. You can select an appropriate bit and operating mode without adding the extra constraints of an impact-compatible accessory.
An impact driver can work with certain compatible hex-shank drilling accessories, but physical fit does not make it the best choice for precision. Check whether the accessory is specifically approved for your tool, material, speed, and intended use rather than relying on a six-sided shank alone.
Imagine installing two cabinet pulls that must line up: an accurately transferred layout and a securely supported door matter more than aggressive driving power. Make and verify a scrap template first, check the hardware spacing, and use an appropriate drilling setup to keep the finished surface intact.
If your goal is a screw, examine the joint
A short screw holding a small hinge presents a different problem from a long fastener in dense stock. For the hinge, you want controlled seating and immediate feedback; a drill driver at a suitable low clutch setting, followed by a manual finish where appropriate, gives you time to respond.
For repetitive heavier fastening within the manufacturer’s scope, the impact driver can become a useful choice. Bosch identifies long screws and other demanding fasteners as typical applications, but that description does not override the fastener’s installation requirements or establish a structural connection’s adequacy.
If resistance suddenly rises, stop to investigate instead of automatically changing tools. A screw can be too long, misaligned, unsuitable for the material, or meeting an obstruction, and extra torque can turn a correctable setup problem into a broken fastener or damaged work.

Give each accessory its own compatibility check
Read the accessory label for impact suitability, drive profile, size, and any operating limits. A bit can fit the collet and still be the wrong type for the tool or fastener, so keep the packaging or model information until you understand the set.
For a drill chuck, center the permitted shank between the jaws with power isolated as the manual requires. For a quick-change collet, follow the model’s insertion and retention procedure, then verify that the bit is properly retained before you bring it to the screw.
Keep the shortest accessory that gives you practical access and full engagement without the tool body hitting the work. An extension can help you reach a recessed screw, but it also changes visibility and introduces more connections that you need to inspect.
Before a batch of fasteners, line up one spare screw, the bit, and the hardware on the bench and confirm the pairing. Keeping that little reference beside the project helps you notice when a different screw length or drive type has accidentally entered the pile.
Sort worn or damaged tips out of your working set instead of leaving them beside good bits of the same size. When you are concentrating on the project, you should not have to remember which nearly identical bit slipped on the previous screw.
Learn the controls before you need restraint
The numbered collar on a drill driver is not interchangeable with an impact driver’s mode selector. Impact models differ widely in speed stages and electronic assistance, so read what your exact mode actually does rather than assuming that its lowest setting provides calibrated torque control.
On a practice joint, approach the screw slowly and pause before it seats. Check the gap, the hardware position, and whether the head is where the assembly instructions require it, then finish with enough control to avoid crushing or distorting the parts.
For assemblies with a specified final torque, follow the maker’s procedure and use the required measuring tool. Neither the sound of an impact driver nor a remembered clutch number tells you that a bicycle part, mechanical assembly, or critical fastener has reached its correct torque.
Use a two-tool rhythm when it saves real effort
For a small nonstructural shop project, you might leave the appropriate drill bit in the drill and the correct driving bit in the impact driver. That can reduce accessory changes, provided both tools suit the task and you have practiced the final seating step.
Arrange a clear place for each tool so its accessory points away from your hands and the walking path. If the bench is too small for two tools, a drill with deliberate bit changes may be a better workflow than a cluttered surface full of ready-to-run accessories.
Mark your pilot locations, drill the required holes, and verify the joint before beginning the fastening run. Keeping layout, drilling, and seating as separate checks makes it easier to catch a shifted part than alternating rapidly between tools without looking at the work.
For example, assemble one corner of a simple storage box before repeating the other corners, and inspect whether the pieces meet as planned. If the first joint needs a different pilot arrangement or a more controlled final turn, you can correct the method before multiplying the same mistake.
Know when the manual screwdriver wins
For a small machine screw entering an existing threaded hole, start it by hand as the assembly instructions direct. If it does not turn freely at the beginning, remove it and inspect alignment instead of asking a powered tool to force it into place.
A manual driver also gives you useful feedback at fragile trim, small hinges, and hardware that is almost seated. Choose a handle and bit that let you stay in line with the fastener, rather than twisting from an awkward angle because the larger power tool happens to be nearby.
You may discover that the right answer is to postpone the job until you have better access. Removing a permitted drawer or repositioning a loose part can make a careful operation possible, while a clever adapter cannot compensate for being unable to see the screw.
Use the result as your final check
After the first completed fastener, inspect the head, surrounding material, and joint before repeating the process. A shiny damaged recess, an enlarged surface depression, or a gap that never closed tells you to revise the setup while you still have only one example to fix.
Use eye protection, control the work, and follow the tool’s guidance for hearing protection and other task-specific hazards. Choose the drill, impact driver, or manual driver that lets you complete the required operation predictably, then stop when the joint is correctly assembled.