Choose a drill bit by the material it must cut, the hole you need, and the tool that will turn it. Color and shape can help you identify a candidate, but the maker’s stated material compatibility is the deciding check.
A useful first move is to place the bit beside a sample or a clear description of the workpiece before you load the drill. That simple pause keeps a mixed accessory box from turning into a guessing game once you are already standing at the project.
Name the actual material
“A wall” is not a material specification: your bit may first pass through paint, plaster, tile, or another surface before reaching a different substrate. Identify the layers, check for hidden services, and understand the required fastening system before selecting a diameter or operating mode.
Wood also covers several different situations, from a solid board to thin plywood or a coated panel. Decide whether you need a through-hole, a clean visible opening, or a receiving hole for a specific fastener, because those goals can lead to different bit choices and support arrangements.
For metal, distinguish the material and thickness rather than treating a light bracket and a stainless-steel component as equivalent. If the piece is part of a safety-critical assembly, get the approved procedure instead of experimenting with a general household drilling guide.
Recognize useful wood-bit features
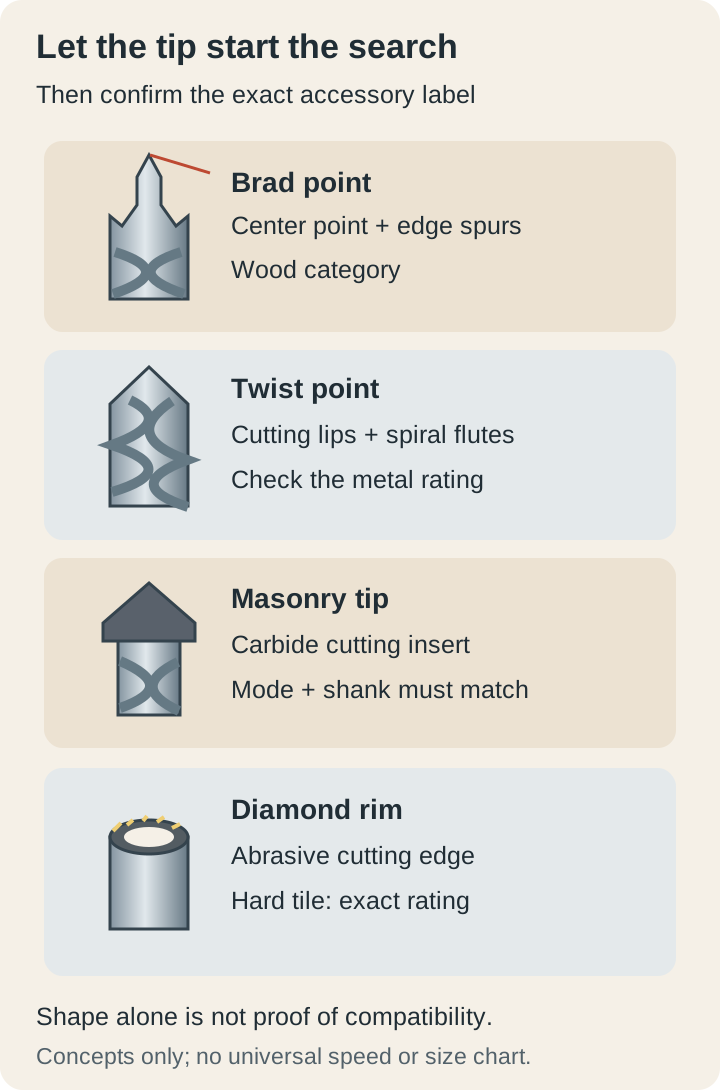
A brad-point wood bit has a projecting center point and cutting features around the outer edge. Bosch describes its wood brad-point range as using the center to locate the bit, spurs to cut the perimeter, and flutes to carry chips out.
For a visible hole in a small wooden panel, those features give you a reasonable category to investigate. You still need the right diameter, suitable backing and workholding, and a trial on matching scrap before assuming the finished surface will look the way you want.
Spade bits, augers, Forstner bits, and hole saws solve different hole-making problems and have their own tool, speed, and capacity requirements. Choose one because its documented purpose matches your hole, rather than because the largest accessory in the box happens to have a shank that fits.
Check working length as well as total length when drilling to a required depth. A long-looking bit can have less usable cutting reach than you expect, and burying an accessory beyond its intended working section is not a sound way to gain a little extra depth.
For metal, read the cutting specification
High-speed steel twist bits are a common metal-drilling category, while specialized alloys, coatings, and geometries target particular materials and conditions. Treat terms such as cobalt or titanium as information to investigate rather than a shortcut that makes any bit suitable for every metal.
Bosch lists its metal HSS-G twist-bit range for rotary drills and identifies the suitable metals on the accessory page. Follow the manual for your own drill and the bit maker’s material, speed, and lubrication instructions instead of applying a generic “always add oil” rule.
A thin loose metal part must not become a rotating propeller if the bit grabs it. Plan suitable clamping, backing, edge handling, and chip control before cutting, and keep hands clear rather than relying on a tighter grip to hold a small bracket still.
After a hole, inspect for sharp edges and use a suitable deburring method if the project requires it. Do not brush chips away with bare fingers or test a newly cut edge by sliding your hand across it.
Treat tile as its own drilling problem
Tile may require a glass-and-tile accessory or a diamond drilling accessory, depending on the exact tile and the manufacturer’s rating. Porcelain can differ substantially from softer tile, so save packaging or obtain a reliable material identification before you risk a finished surface.
Bosch’s tile guide distinguishes the tile layer from the wall behind it and advises switching off hammer action while drilling the tile. Cooling and starting technique depend on the selected accessory, so use its instructions rather than assuming every diamond bit needs the same treatment.
Water-cooled drilling also requires an appropriate electrical and water-control setup. If you cannot manage that arrangement, cannot identify the hidden services, or are working near a waterproofing system you do not understand, have a qualified installer handle the hole.
Try the accessory on a spare matching tile where possible and decide in advance how you will support and locate the hole. A perfect diameter on the package will not protect you from a wandering start, unsupported material, or a hole placed too close to an edge.
Match masonry accessories to the mechanism
Many masonry bits have a distinct carbide cutting tip, but the shank and approved operating mode still matter. A cylindrical masonry bit intended for a three-jaw chuck is different from an SDS accessory intended for the corresponding rotary-hammer holder.
Do not clamp an incompatible shank into a convenient chuck or use an adapter as proof that every mode is permitted. Check both manufacturers’ compatibility information, including tool capacity and accessory length, before you put the assembly under load.
Brick, block, and concrete also differ, and the anchor instructions may specify the precise bit type, diameter, embedment, and hole-cleaning procedure. This guide helps you choose an accessory category; it does not design an anchor connection or establish how much a wall can support.
Read the whole label before loading the bit
Look for cutting diameter, shank size and form, material suitability, speed limits, and any required cooling or operating mode. Separate those facts from pack quantity and marketing names so a long accessory description does not hide the measurement your project actually needs.
For an anchor hole, use the anchor manufacturer’s required size rather than selecting the nearest bit by eye. For a screw joint, distinguish the receiving pilot, upper-board clearance, and head recess before picking a diameter, because they do different jobs.
Keep a simple project note with the hole’s purpose, material, selected bit identifier, and required finished size. If the accessory gets mixed back into the case during a break, that note gives you a reliable way to restart without comparing several nearly identical bits from memory.
Inspect the accessory for visible damage and isolate power before installing or changing it as the tool manual requires. Verify that the permitted shank is seated and retained correctly, then remove any chuck key before reconnecting power.
Use a scrap test to answer specific questions
Write down what you want the trial to tell you: whether the bit starts at the mark, whether the surface remains acceptable, and whether the resulting hole fits the intended hardware. A test has more value when you can compare its result with a clear target.
Use the same material, backing arrangement, accessory, and settings you intend to use on the real piece. If you change several things after a poor result, you lose the chance to learn which change improved the hole and which one merely added complexity.
Stop if the accessory stops cutting, the work moves, the bit binds, or heat and sound change unexpectedly. Disconnect power and investigate after everything has stopped, rather than leaning harder on a tool that is telling you the setup needs attention.
Keep identified bits separate from mysteries
Return a verified bit to a labeled position and keep its instructions with the set. Put an unidentified or damaged accessory aside until you can identify it confidently, because a familiar-looking tip is not enough evidence for using it on a costly finished part.
Your useful collection can stay small: buy the correct accessory for the next real job, learn its limits, and store it so you can recognize it later. That approach makes the next choice faster without requiring you to memorize every drill-bit shape at once.