A good fastener organizer helps you find a known item, not just a screw that looks close enough. Build your system around the information you would need to buy the same fastener again, and keep uncertain leftovers clearly separate.
You do not need a wall of matching drawers to start. A few labeled containers, the original packages, and a small place for unidentified parts will usually tell you what kind of permanent storage you actually need.
Start with one collection you can finish sorting
Choose a manageable group, such as the hardware left from recent furniture assembly or the screws you regularly use for small shop projects. Leave unrelated boxes closed so your first sorting session does not take over the whole workbench.
Set out a tray for the group you are sorting and separate containers for identified parts, project-specific hardware, and unknowns. Keep small items away from children and pets during the session and after you store them.
Save packaging before you empty anything into a bin. A clear label, maker’s item number, or project instruction sheet can tell you things that appearance alone cannot establish.
If you already have a mixed coffee can, treat it as an identification project rather than a ready supply. You can keep useful known items without pretending that every unknown screw needs a place in your working stock.
Sort by job before sorting by length
Make broad families that match how you look for hardware: machine screws and bolts, wood screws, nuts and washers, and special project fittings. Keep manufacturer-supplied sets together when the instructions specify a particular combination.
Then separate the families by the information you can verify. For packaged stock, that may include the material, finish, head style, drive type, and exact size stated by the supplier.
Do not label every shiny piece stainless steel or every dark piece a structural fastener. If the original specification is missing, write “material unknown” or keep the item in the unidentified group.
A storage label is an identification record, not an engineering approval. For load-bearing, safety-related, exterior, or manufacturer-specified connections, choose the fastener documented for the application instead of upgrading a mystery item by appearance.

Identify diameter separately from the head
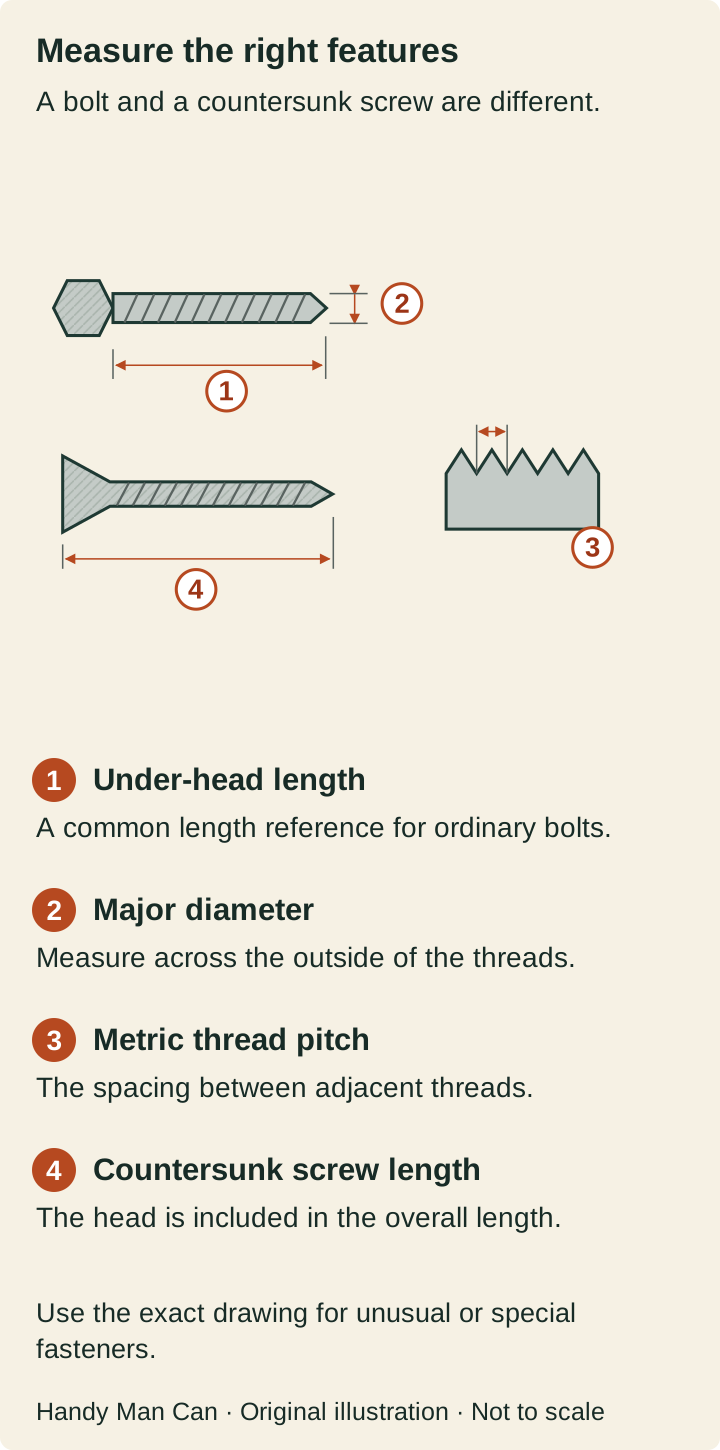
Bolt Depot explains that fastener diameter usually refers to the outside thread diameter, also called the major diameter. The width across a hex head is a wrench measurement, so it should not stand in for the bolt’s thread size.
Use a suitable measuring tool or a documented gauge to narrow down an unknown item. If your reading falls between plausible sizes, keep the result provisional rather than rounding toward the bin you happen to own.
Take a known packaged fastener through your measuring process first. That gives you a practical reference for how you are holding the tool and where the measurement belongs, without making the unknown part your only example.
Keep inch-based and metric hardware in separate sections from the beginning. You can arrange those sections beside each other, but a shared “small bolts” drawer makes it too easy to lose the distinction later.
Give thread spacing its own field
Bolt Depot distinguishes threads per inch from metric thread pitch: the first counts threads along an inch, while the second describes the distance between adjacent threads in millimeters. Similar-looking diameters can therefore still have different threads.
Read a thread gauge using its own instructions and compare it with a known example. Do not force a nut onto an uncertain bolt as a substitute for identifying the thread.
On your label, keep the thread information beside the diameter rather than on a separate scrap of paper. A label that loses its thread spacing becomes much less useful the next time you need a matching nut.
For example, you might keep a confirmed package marked M6 × 1.0 together with its full supplier description. That example is an identification format, not a recommendation that the size suits your next project.
Measure length from the correct reference
Bolt Depot’s general length guidance measures a head-above-surface fastener from under the head to its end, and a countersunk fastener from the top of the head to its end. It also identifies special fasteners for which you need the specific dimensional drawing.
Put a small sketch of the reference point in your measuring area. You are more likely to catch an error while sorting than after two different measuring habits have filled the same drawer.
Keep special shapes in their own labeled packets until you have checked their drawings. A shoulder bolt, hanger bolt, or furniture connector deserves a clearer record than a guessed overall length.
If you are replacing missing furniture hardware, use the furniture maker’s part description and instructions first. A storage system can help you find the documented part, but it cannot decide whether a nearby size is an acceptable replacement.
Write labels that help you reorder
Use the same information order on each label: family, size and thread, length, material or finish, then source or item number. You do not need every field for every part, but you should make missing information obvious.
Attach the original package label to the container or keep a readable copy with the stock. If you later split a box between two drawers, duplicate the identification information at the same time.
Add a plain-language reminder when it helps your own search, such as “cabinet hinge spares” or “workbench project.” Keep that reminder separate from the verified size so a project nickname does not become the only description.
Use a small removable sample inside the compartment only when it cannot migrate into neighboring bins. A sample is handy for recognition, but it should support the written record rather than replace it.
Build a bin map that can grow slowly
Put your most frequently used known stock in the easiest positions and leave some room beside each family. Number the physical locations so you can move stock without rewriting your whole mental map.
Start a simple index with the location, label description, and supplier item number. A paper card works if your collection is small; the point is to find the item without opening every lid.
For quantities, choose a level of effort that fits how you work. You might count a small matched project kit exactly while marking bulk stock as enough for the next planned task or ready to reorder.
Keep the unknowns container intentionally small and review it before adding more compartments. If you never identify an item and would not trust it for a real job, keeping it forever does not improve your useful inventory.
Use project kits for hardware that travels together
A small bag for each disassembled item can be more useful than sending every screw into the general collection. Label the bag with the assembly name and the part location, and keep it with the relevant instructions until the item is rebuilt.
For example, keep the fittings removed from a drawer slide together rather than mixing them with spare hinge screws. Both groups may look familiar on the bench, but the project record helps you return each one to its documented place.
When a kit needs replacements, record which parts are missing instead of topping it up with approximate matches. That preserves a clear question for the maker or supplier and stops an uncertain substitute from becoming part of your permanent stock.
Create a return routine that protects the labels
Bring only the needed container to the work area and close the others before you begin. When the job ends, return clearly identified unused stock to its matching location and keep removed hardware with its original assembly.
If loose pieces become mixed during the project, send them back through the identification tray. That small delay protects the work you already put into sorting and makes the next search feel much less like a guessing game.