Buy clamps for the joint you can actually reach
A quick-grip clamp is useful when you want to hold two pieces together while keeping a hand free for positioning. The right choice depends on the opening, throat depth, contact surfaces, and number of clamps your project needs, rather than the biggest force number on a package.
This research-based shortlist compares the IRWIN 1964758 four-pack, Jorgensen E-Z HOLD four-pack identified as 99216A, and single BESSEY EHKL06. Each selected version has a nominal six-inch clamping capacity, but the packages and jaw geometry are different.
Choose the IRWIN or Jorgensen package when several small holding points are the priority, or examine the BESSEY when you need its documented deeper throat. We haven’t tested their force, pad marking, durability, or hand comfort, so those are questions to check rather than invented score categories.

Measure the opening and the throat separately
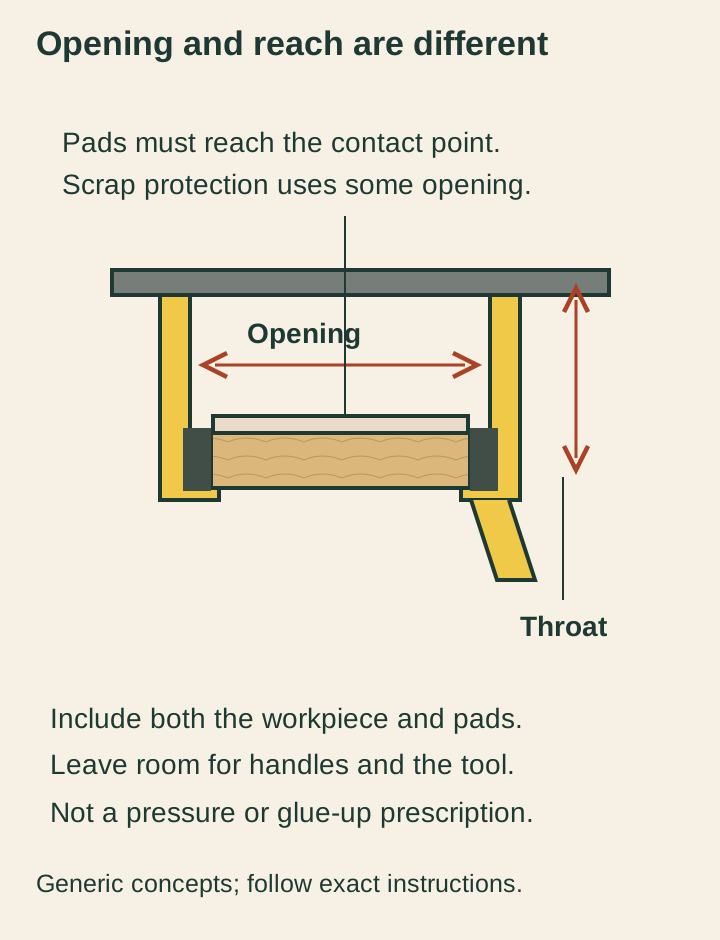
Clamping capacity is the opening between the jaws, while throat depth describes how far the contact point reaches in from the bar. A clamp can open wide enough for a stack and still fail to put its pads over the place where you need pressure.
Sketch your project from the side and mark the desired contact point before buying. Include any protective pads or scrap blocks in the thickness, since they occupy part of the available jaw opening rather than appearing for free.
Also check the room needed for the handle and the exposed end of the bar. A clamp that fits the boards on an open bench may become awkward against a cabinet side, wall, or neighboring clamp during the real assembly.
| Exact selection | Useful distinction | Check before buying |
|---|---|---|
| IRWIN 1964758 four-pack | Four six-inch QUICK-GRIP mini one-hand bar clamps | Match your work, current selected package and exact instructions; no hands-on performance claim. |
| Jorgensen E-Z HOLD four-pack | Four six-inch light-duty clamps; not medium-duty model | Match your work, current selected package and exact instructions; no hands-on performance claim. |
| BESSEY EHKL06 | One six-inch EHKL06 trigger clamp; not EHKM06 or EHKXL | Match your work, current selected package and exact instructions; no hands-on performance claim. |
IRWIN 1964758: four compact holding points

The inspected IRWIN 1964758 package contains four six-inch QUICK-GRIP one-hand mini bar clamps. The exact-model maker page describes their quick-release operation and protective pads, making the package a straightforward option when your project needs several small clamps at once.
Consider it for positioning small parts or holding a simple assembly while you check its fit. Four clamps give you more places to distribute contact, but the correct number and placement still come from the joint, adhesive instructions, and workholding needs.
Don’t turn the included pads into a promise that every finish will remain unmarked. Dirt, trapped chips, pressure, a delicate coating, or a soft wood surface can change the result, so check a representative offcut and use appropriate protection where needed.
The current listing and maker material contain inconsistent headline force figures, which we haven’t used to rank it. If a particular force specification is essential to your operation, resolve the exact current documentation with IRWIN before relying on that number.
Jorgensen E-Z HOLD 99216A: another four-clamp layout

The selected Amazon listing is the four-piece, six-inch light-duty E-Z HOLD package, identified as 99216A in the inspected product information. It lists a 2-3/8-inch throat and describes conversion between clamping and spreading, features worth checking against your actual access needs.
Consider it when you want a small group of trigger-operated clamps and value that convertible arrangement. Confirm the selected package and model carefully because Jorgensen uses similar E-Z HOLD branding across different duty classes and sizes.
The listing makes several force statements that don’t agree cleanly with each other, so this guide avoids presenting them as a measured advantage. We also don’t substitute specifications from a medium-duty manufacturer page for this light-duty package simply because the names look similar.
Conversion features can add useful flexibility, but follow the exact package instructions for removing and securing the jaw. A spreading configuration is a distinct setup, and the clamping opening doesn’t automatically describe its complete spreading range or suitability for your task.
BESSEY EHKL06: a single clamp with a deeper throat

BESSEY’s official one-handed clamp brochure identifies EHKL06 as a six-inch model with a 3-1/8-inch throat. The inspected Amazon selection matches that model, rather than the shallower EHKM06 or the larger EHKXL version.
Consider it when reaching farther from the edge matters more than receiving four clamps in one package. Compare its throat with a sketch of the contact point, then decide whether one clamp is enough or whether your assembly requires a matched pair or more.
BESSEY publishes a 300-pound clamping-force figure for this specific model, but that is a manufacturer specification, not our measurement. It doesn’t establish how much pressure your joint needs, whether a surface will dent, or whether a particular workpiece will remain stable.
The documented jaw release allows conversion to spreading without tools. That feature is useful only when the converted geometry and the maker’s instructions suit the operation, so don’t let it replace checking the ordinary clamping fit first.
Compare package cost by usable positions
A four-pack and a single clamp don’t answer the same shopping question. Count the simultaneous contact points your first project needs before comparing the price of the packages, then include any additional units required to complete the arrangement.
For example, holding a narrow guide against a board may need two well-placed clamps with room for the tool to pass. A wider assembly can need a different distribution, while an unusually shaped part may require a purpose-built fixture rather than more trigger clamps.
Don’t buy extra capacity just to avoid thinking through that layout. An unnecessarily long bar can crowd a small work area, catch on nearby objects, or make the clamp harder to position where your hands need to work.
Dry-fit before adhesive makes the clock matter
Set out the parts, clamps, protective blocks, and instructions before applying adhesive. A dry fit lets you check whether the pads land flat, the joint closes as intended, and the handles remain accessible throughout the sequence.
If the assembly twists as the jaws tighten, stop and examine the contact points and support. More force can hide poor alignment briefly while leaving the same geometry problem in place, so correct the arrangement before treating pressure as the solution.
Adhesive instructions govern open time, clamping requirements, and cure conditions for the specific product and joint. A clamp manufacturer’s headline force number cannot stand in for those directions, and this shortlist doesn’t specify a universal glue-up pressure.
Keep the clamp out of the tool path
Plan both the contact points and the space swept by the tool before beginning the operation. Check the bit, blade, housing, cord, and your hands against the clamp bar and jaws so the workholding doesn’t introduce a new obstruction.
Secure the work according to the tool and clamp instructions, and don’t assume holding two pieces together also secures them to the bench. A small assembly can still move as one object unless your setup addresses that separate movement.
These clamps aren’t lifting devices, structural supports, or an excuse to hold a hazardous operation in an improvised position. When the work doesn’t remain stable and accessible, change the fixture or the plan before switching on a tool.
Decide which compromise fits your first project
Pick the IRWIN package if four mini clamps fit your intended holding points and you prefer that documented configuration. Pick the Jorgensen light-duty package if its verified version and convertible setup suit your work, while keeping its unresolved force claims out of the decision.
Pick the BESSEY EHKL06 when its specific throat depth solves a measured reach problem and you’ve accounted for how many units you need. None of those recommendations promises a particular finish result, adhesive outcome, or service life without the relevant project checks.
After buying, keep the model information and inspect the pads, bar, release, and moving jaw before use. A clamp that is clean, identifiable, and suitable for the joint is more useful than an impressive-looking assortment that doesn’t reach the work.
Check the finish before final tightening
Put a clean protective offcut between the pad and a delicate visible surface when the arrangement and instructions allow it. Check that the added block sits flat and doesn’t push the pad away from the intended pressure point.
A thick block can solve one contact problem while creating an opening or reach problem elsewhere. Repeat the dry fit with all the actual protective pieces installed, so the setup you practiced is the setup you will use.